# Others
# Q1:How to build C++ API?
A: moomoo-api c++ SDK is supported on Windows/MacOS/Linux. Pre-built libs are provided for the common build environment on each platform:
| OS | Building Environment |
|---|---|
| Windows | Visual Studio 2013 |
| Centos 7 | g++ 4.8.5 |
| Ubuntu 16.04 | g++ 5.4.0 |
| MacOS | XCode 11 |
If different compiler version is used, or different protobuf version is used, MMAPI and protobuf may be re-built. MMAPI source directory layout is:
MMAPI directory structure:
+---Bin                               Libs for common build environment
+---Include                           Public headers, source files generated from proto files
+---Sample                            Sample project
\---Src
    +---MMAPI                         MMAPI source
    +---protobuf-all-3.5.1.tar.gz     protobuf source
2
3
4
5
6
7
# Build steps:
- Build protobuf to generate libprotobuf static lib and protoc executable.
- Generated C++ source files from proto files.
- Build MMAPI to generate libMMAPI static lib
# Step1: Build protobuf:
- Windows:
- Install CMake
- Open Visual Studio command prompt, change directory to protobuf/cmake
- Run:cmake -G "Visual Studio 12 2013" -DCMAKE_INSTALL_PREFIX=install -Dprotobuf_BUILD_TESTS=OFF This will generate Visual Studio 2013 solution file. Change -G parameter for other Visual Studio versions.
- Open Visual Studio solution file, set platform toolset to v120_xp, then build.
- Linux (Refer to protobuf/src/README)
- Run ./autogen.sh
- Run CXXFLAGS="-std=gnu++11" ./configure --disable-shared
- Run make
- Put generated libprotobuf.a in Bin/Linux
- MacOS (Refer to protobuf/src/README)
- Install dependencies with brew:autoconf automake libtool
- Run ./configure CC=clang CXX="clang++ -std=gnu++11 -stdlib=libc++" --disable-shared
# Step2: Generate C++ sources from proto files
- Use protoc to convert protofiles under Include/Proto to C++ source files. For example, the following command converts Common.proto to Common.pb.h and Common.pb.cc:
- protoc -I="path-to-MMAPI/Include/Proto" --cpp_out="." path-to-MMAPI/Include/Proto/Common.proto
- Put the generated .h and .cc files in Include/Proto
# Step3: Build MMAPI
- Windows:Create Visual Studio C++ static lib project,add source files under Src/MMAPI and Include,and set platform toolset to v120_xp.
- Mac:Create XCode C++ static lib project,add source files under Src/MMAPI and Include
- Linux:Use cmake to build MMAPI static lib, run following command under path-to-MMAPI/Src:
- cmake -DTARGET_OS=Linux
# Q2: Is there more complete strategy examples for reference?
A:
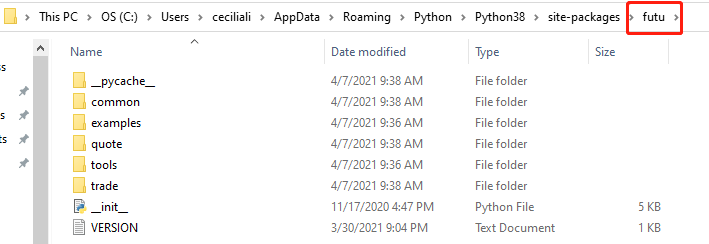
- Python strategy examples are in the /moomoo/examples/ folder. You can find the path of Python API by executing the following command:
import moomoo
print(moomoo.__file__)
1
2 - The C# strategy examples are in the /MMAPI4NET/Sample/ folder
- The Java strategy examples are in the /MMAPI4J/sample/ folder
- The C++ strategy examples are under the /MMAPI4CPP/Sample/ folder
- The JavaScript strategy examples are in the /MMAPI4JS/sample/ folder
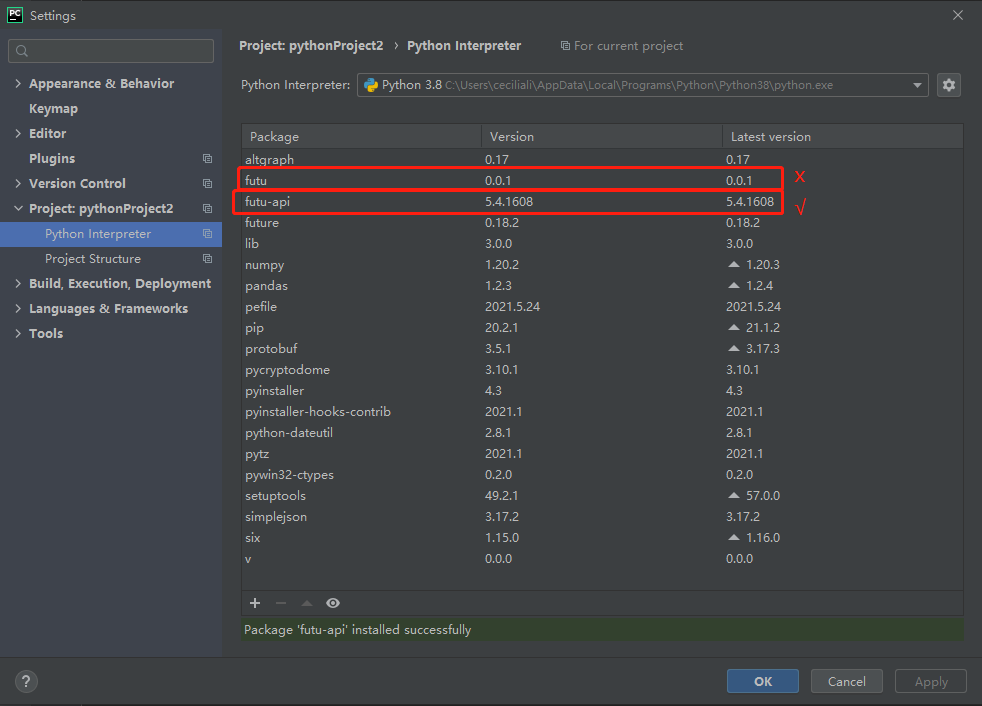
# Q3: Import error when using python API
First Scene:
I have already installed moomoo-api, but still get error: No module named 'moomoo'?
It is possible that the interpreter your IDE currently uses is not the interpreter of the moomoo-api module you installed. In other words, your may have more than two Python environments installed on your computer.
You can do the following 2 steps:
- Run the codes below to get the path of the current interpreter:
import sys
print(sys.executable)
2
Example diagram:

- Run
$ D:\software\anaconda3\python.exe -m pip install moomoo-apiin command line (The first half of the command comes from the result of step 1). This will install a moomoo-api module in the current interpreter.
# Q4: Import successful, but you still cannot call the relevant interface.
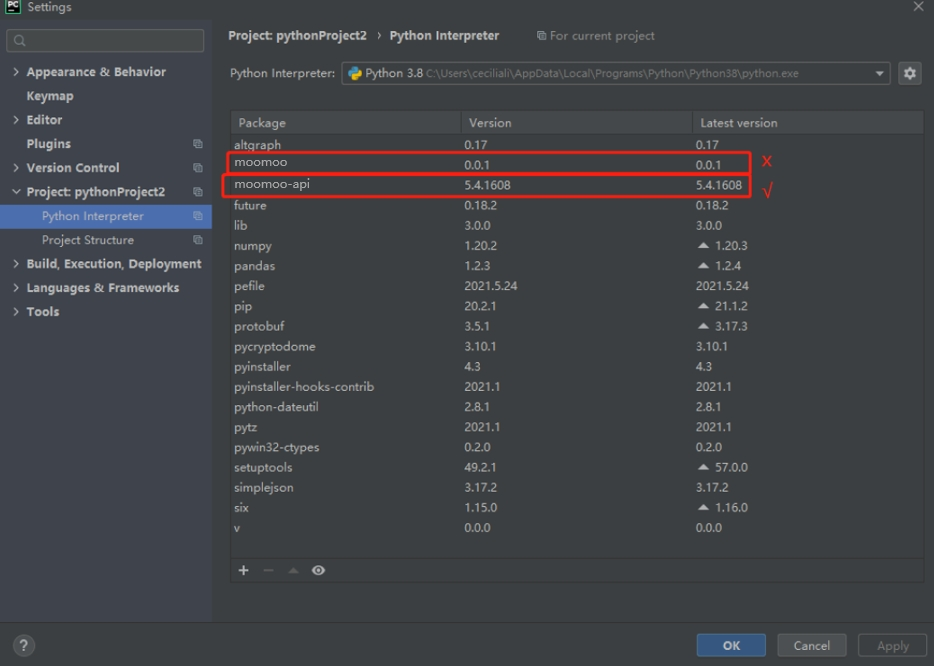
A: Usually in this case, you need to check if the ‘moomoo’ that was successfully imported is a correct moomoo API.
First Scene: There may be a file with the same name as 'moomoo'.
- The current file name is moomoo.py
- There is another file named moomoo.py under the path of the current file.
- There is a folder named
/moomoounder the path of the current file.
Therefore, we strongly recommend that you do not name files / folders / projects as moomoo.
Second Scene: A third-party library called 'moomoo' was installed by mistake.
The correct name of the moomoo API library is moomoo-api, not 'moomoo'.
If you have installed a third-party library named 'moomoo', please uninstall it and install moomoo-api.
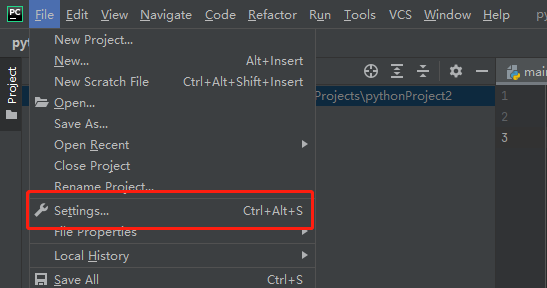
Take PyCharm as an example: Check the installation of libraries.
# Q5: Protocol Encryption-Related
A:
# Overview
To ensure privacy and confidentiality, you can use the asymmetric encryption algorithm RSA to encrypt the request and return between Strategy Scripts (moomoo API) and OpenD.
If Strategy Scripts (moomoo API) is on the same computer as OpenD, it is usually not necessary to encrypt.
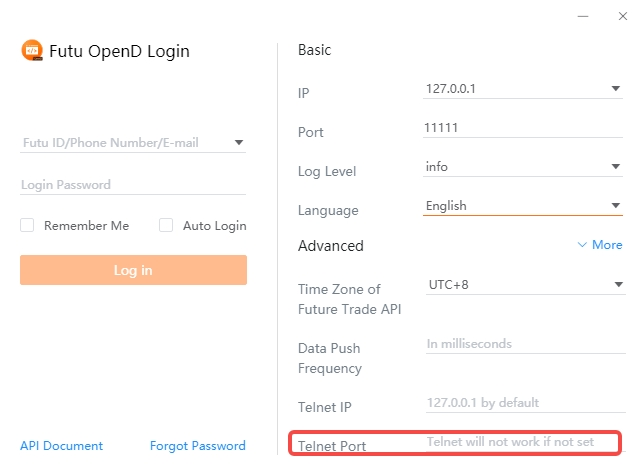
# Protocol Encryption Process
You can try to solve this problem with the following steps:
- Generate the key file automatically through a third-party web platform.
- To be specific: Search 'Online RSA Key Generator' on Baidu or Google. Set Key Format as PKCS#1. Set Key Length as 1024 bit. No password required. Then click the bottom 'Generate key pair'
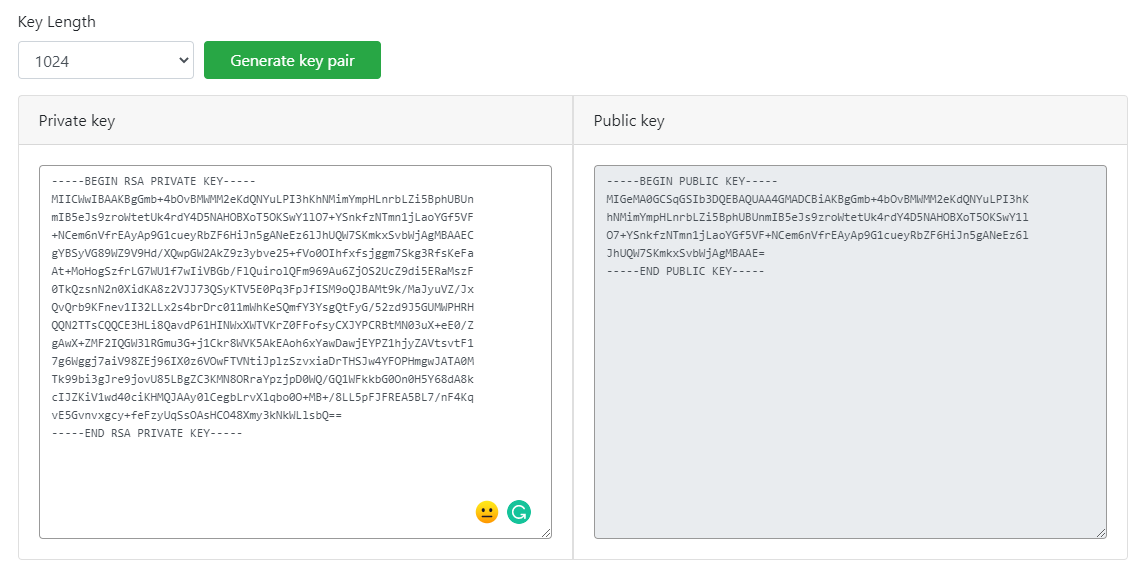
- To be specific: Search 'Online RSA Key Generator' on Baidu or Google. Set Key Format as PKCS#1. Set Key Length as 1024 bit. No password required. Then click the bottom 'Generate key pair'
- Copy and paste the private key into a text file. Save it to a specified path of the computer which OpenD is located in.
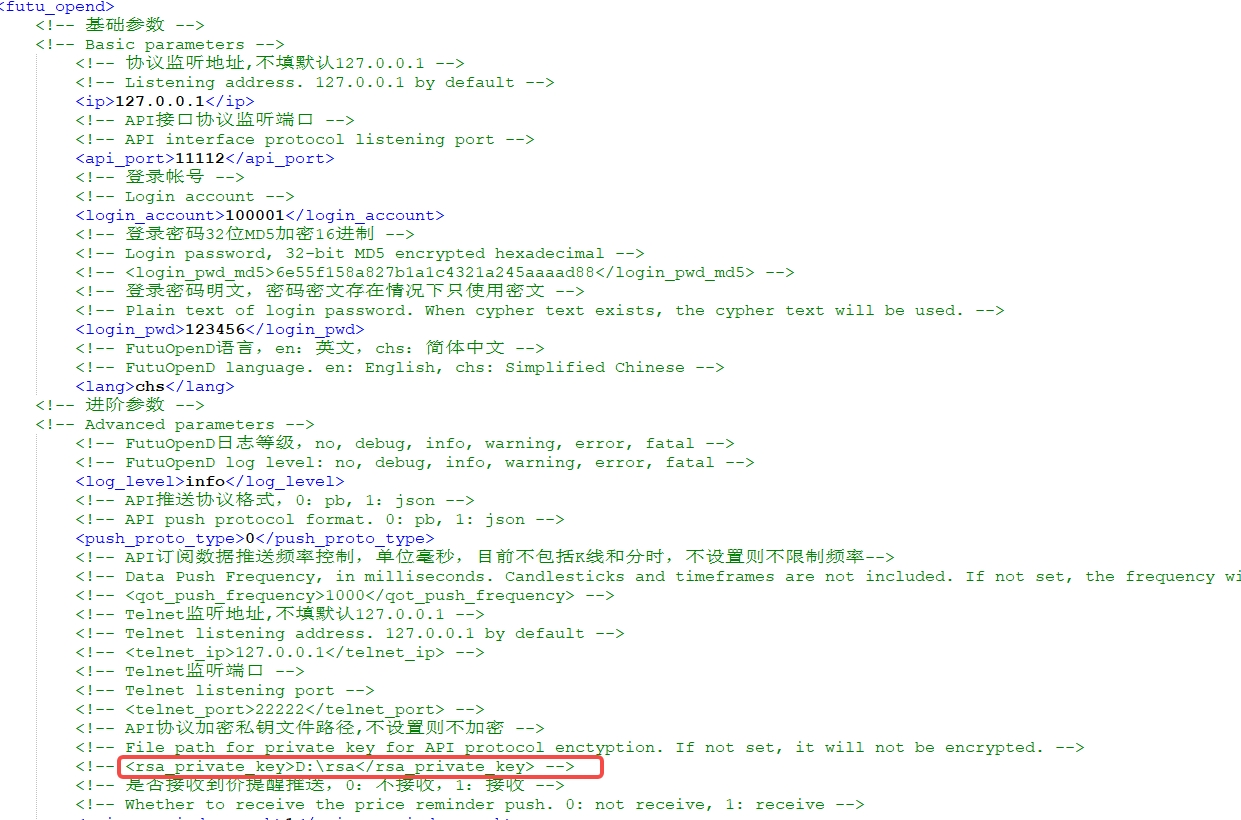
- Specify the path of the RSA private key file on the computer which OpenD is located in. The path is the specified path mentioned in Step 2.
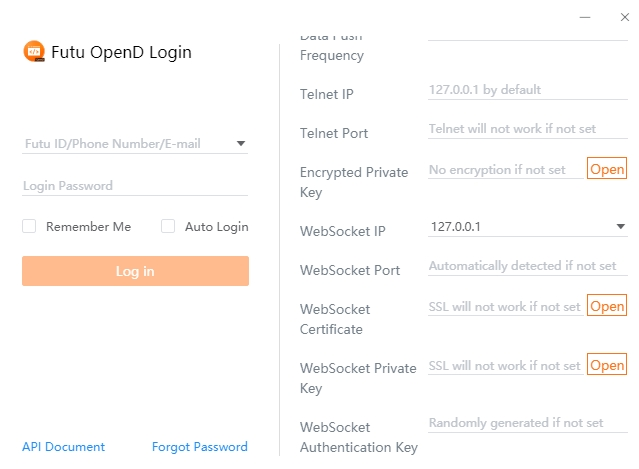
- Method 1: Specify the path mentioned in Step 2 through 'Encryption Private Key' in Visualization OpenD. As shown below:
- Method 2: Specify the path mentioned in Step 2 through the code
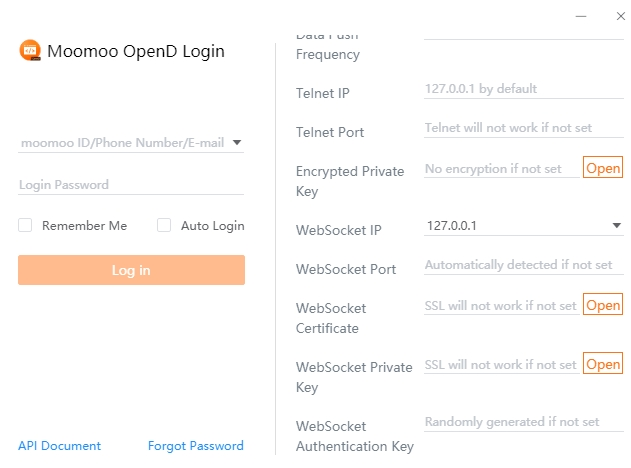
rsa_private_keyin Command Line OpenD. As shown below: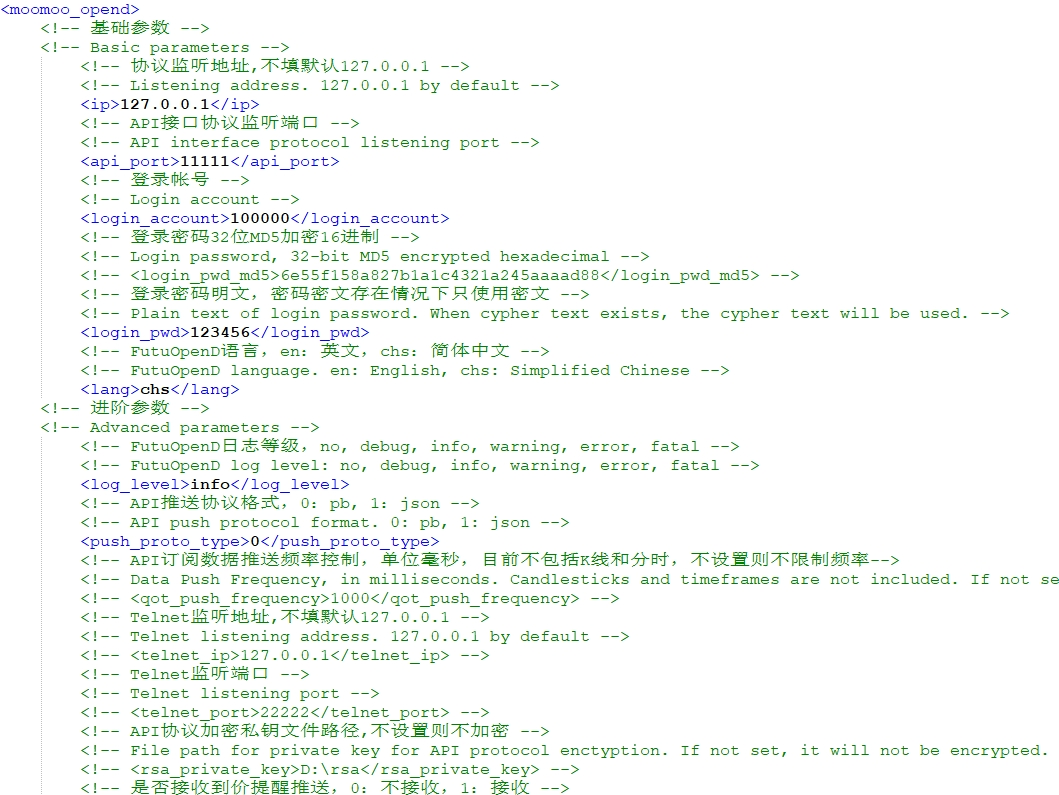
- Method 1: Specify the path mentioned in Step 2 through 'Encryption Private Key' in Visualization OpenD. As shown below:
- Save the text file in step 2 to a specified path of the computer which Strategy Scripts (moomoo API) are located in, and set the path of private key in Strategy Scripts.
- Enable protocol encryption. There are two ways to enable protocol encryption.
- Method 1: Encrypt the context independently (general). You can set encryption through the parameter
is_encryptwhen creating and initializing the connection in Quote Object or Transaction Objects. - Method 2: Encrypt the context globally (only Python). You can set encryption through the interface enable_proto_encrypt.
- Method 1: Encrypt the context independently (general). You can set encryption through the parameter
Tips
- When specifying the path of RSA private key in OpenD or in Strategy Scripts (moomoo API), the path needs to be complete and include the file name.
- It is not necessary to save RSA public key which can be calculated by private key.
# Q6: Why is the DataFrame data I got incomplete?
A: When printing pandas.DataFrame data, if there are too many columns and rows, pandas will collapse the data by default, resulting in an incomplete display.
Therefore, it is not OpenD's fault. You can add the following code in front of your Python script to solve the problem.
import pandas as pd
pd.options.display.max_rows=5000
pd.options.display.max_columns=5000
pd.options.display.width=1000
2
3
4
# Q7: How to solve the problem that "Cannot open libFTAPIChannel.dylib" through C++ API on Mac?
A: Execute the following command in the directory where the file "libFTAPIChannel.dylib" is stored: $ xattr -r -d com.apple.quarantine libAPIChannel.dylib.
# Q8: For Python users, why do large log files continue to be generated under the log folder, after the log level is set to no in the OpenD configuration file?
A:The log_level parameter in OpenD parameter configuration is only used to control the logs generated by OpenD. Python API also generates logs by default.
If you do not like it, you can add the following codes to your Python script:
logger.file_level = logging.FATAL  # Used to stop Python API log files generating
logger.console_level = logging.FATAL  # Used to stop printing Python log in running console
2
# Q9: For versions 5.4 and above, the library name and configuration method of Java API have been changed.
A:
If you are a user of Java API 5.3 and below, please note the following changes when updating the version.
Changes to the configuration process:- Download moomoo API from moomoo official website.
- Decompress the downloaded file.
/MMAPI4Jis the directory of Java API. Add/lib/moomoo-api-.x.y.z.jarfile to your project settings. To establish a moomoo-api project, please refer to here.
Changes to the directory:
- For the Java version of moomoo API, the library name is changed from ftapi4j.jar to
moomoo-api-x.y.z.jar, where "x.y.z" represents the version number. - For the third-party library, the dependencies of /lib/jna.jar and /lib/jna-platform.jar are removed, and the dependencies of
/lib/bcprov-jdk15on-1.68.jarand/lib/bcpkix-jdk15on-1.68.jarare added.
+---mmapi4j                      MMAPI4J source code. If the JDK version used is not compatible, you can use the project to recompile the mmapi.jar.
+---lib                          The folder with common libraries
|    moomoo-api-x.y.z.jar          Java version of moomoo API
|    bcprov-jdk15on-1.68.jar     Third-party library, for encryption and decryption
|    bcpkix-jdk15on-1.68.jar     Third-party library, for encryption and decryption
|    protobuf-java-3.5.1.jar     Third-party library, for parsing protobuf data
+---sample                       Sample project
+---resources                    The default generated directory of the maven project
1
2
3
4
5
6
7
8If you are a new user to the moomoo API, we provide a more convenient way to configure Java API via maven repository for you. About the configuration process, please refer to here.
# Q10: For Python users, when using pyinstaller to package scripts that need to run api, an error is reported: Common_pb2 module cannot be found.

A: You can try to solve this problem with the following steps.
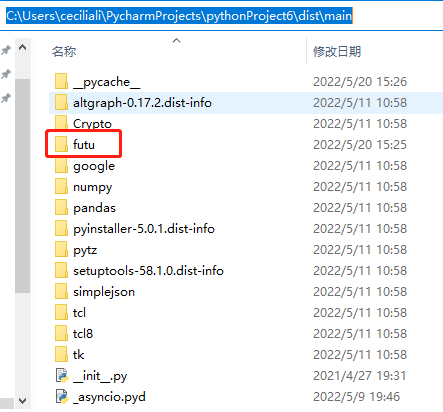
Step 1. Suppose you need to package main.py. Using a command-line statement and run the statement: pyinstaller path\main.py, without the "- F" parameter.
pyinstaller path\main.py
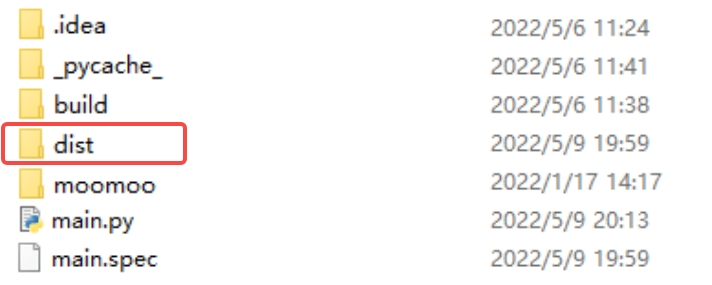
After main.py is packaged, the /main folder will be created in the /dist directory where it is located. main.exe is in this folder.
Step 2. Run the following code to find the installation path of moomoo-api: /path/moomoo.
import moomoo
print(moomoo.__file__)
2
Results:
C:\Users\ceciliali\Anaconda3\lib\site-packages\moomoo\__init__.py
Step 3. Copy all the files in the /common/pb to /main.
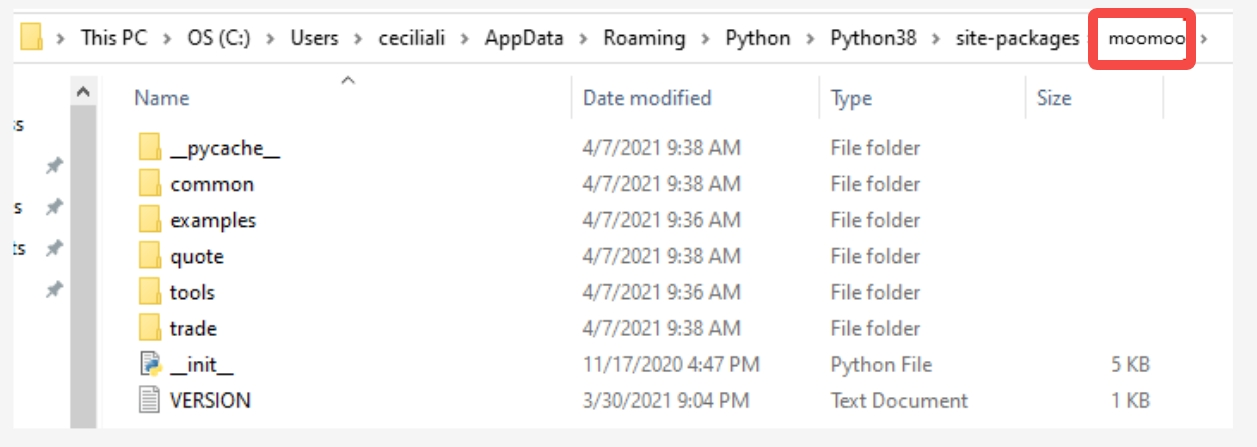
Step 4. Create a folder in the /main and name it moomoo. Copy the /path/moomoo/VERSION.txt file to /main/moomoo.
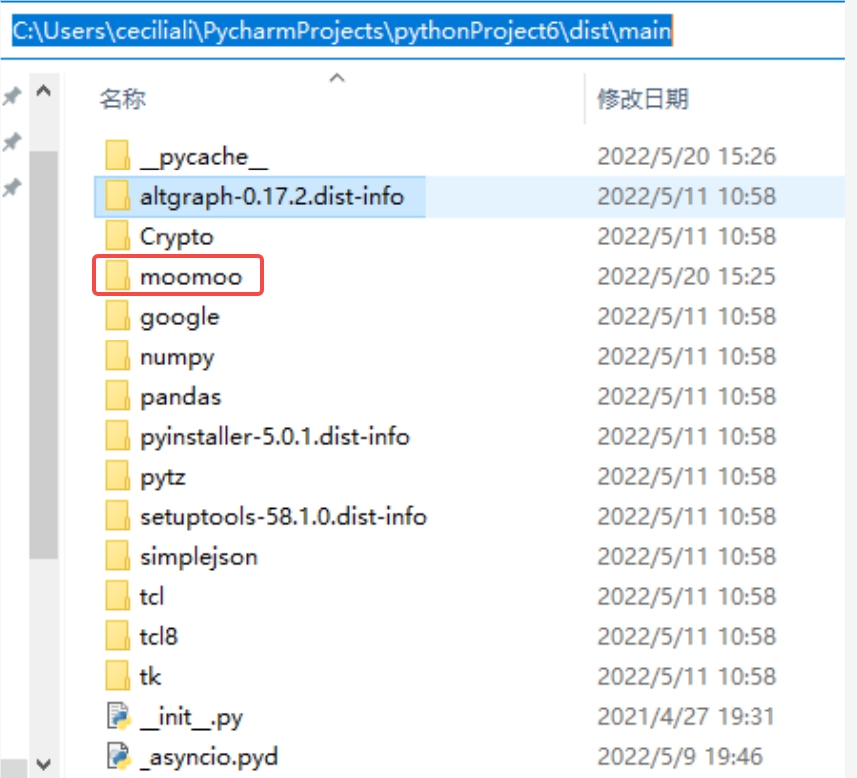
Step 5. Try running the statement pyinstaller main.py again.
# Q11: Why the interface result is success, but the return did not behave as expected?
A:
A successful interface result means that server has successfully received and responded to your request, but the return may not behave as your expected.
Example: If you call the subscribe during non-trading hours, your request can be responded successfully, but the exchange will not update the ticker data during this period. So you will temporarily not receive real-time data until trading hours.
The interface result (definition: Interface Result) can be viewed from the field returned. A field of 0 means the interface result success, a non-zero means the interface result failed.
For python user, the following two code statements are equivalent:
if ret_code == RET_OK:1if ret_code == 0:1
# Q12: WebSocket Related
# Overview
In OpenAPI, WebSocket is mainly used in the following two aspects:
- In Visualization OpenD, WebSocket is used to communicate between the UI interface and the underlying Command Line OpenD.
- The communication between JavaScript API and OpenD uses WebSocket.
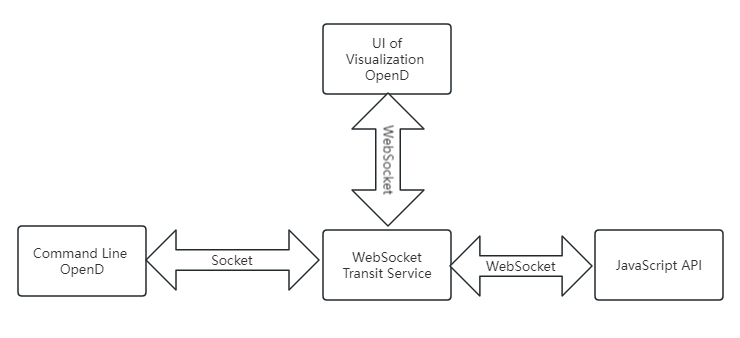
- When WebSocket starts, Command Line OpenD establishes a Socket connection (TCP) with the MMWebSocket transit service. This connection uses the default listening address and API protocol listening port.
- At the same time, JavaScript API will establish a WebSocket connection (HTTP) with the MMWebSocket transit service. This connection will use the WebSocket listening address and WebSocket port.
# Usage
To ensure the security of your account, when WebSocket listens non-local requests, we strongly recommend that you enable SSL and configure the WebSocket authentication key
SSL is enabled by configuring the WebSocket certificate and the WebSocket private key. Command Line OpenD can set the file path by configuring OpenD.xml or configuring command line parameters. Visualization OpenD clicks the "more" drop-down menu to see the confifuration item.
Tips
If the certificate is self-signed, you need to install the certificate on the machine where the JavaScript API is called, or set not to verify the certificate.
# Generate Self-signed Certificate
It is not convenient to expand the details of self-signed certificate generation in this document, please check it yourself. Simple and available build steps are provided here:
- Install openssl.
- Modify openssl.cnf and add the IP address or domain name under the alt_names node on the machine where OpenD locates.
For example: IP.2 = xxx.xxx.xxx.xxx, DNS.2 = www.xxx.com - Generate private key and certificate (PEM)。
The certificate generation parameters are as follows:
openssl req -x509 -newkey rsa:2048 -out moomoo.cer -outform PEM -keyout moomoo.key -days 10000 -verbose -config openssl.cnf -nodes -sha256 -subj "/CN=moomoo CA" -reqexts v3_req -extensions v3_req
Tips
- openssl.cnf needs to be placed under the system path, or an absolute path needs to be specified in the build parameters.
- Note that while generating a private key, you need to specify that the password is not set (-notes).
Attach the local self-signed certificate and the configuration file that generates the certificate for testing:
# Q13: Where are the quote servers and the trade servers of OpenAPI?
A:
- Quote:
| Futu ID | Quote Server Location |
|---|---|
| Futubull ID | Tencent Cloud Guangzhou and Hong Kong |
| moomoo ID | Tencent Cloud Virginia, USA and Singapore |
- Trade:
| Securities Firm | Trade Server Location |
|---|---|
| FUTU HK | Tencent Cloud Hong Kong |
| Moomoo US | Tencent Cloud Virginia, USA |
| Moomoo SG | Tencent Cloud Singapore |
| Moomoo AU | AWS Cloud Sydney |